Open Leads is committed to maintaining high deliverability rates for email that is sent out from our application.
One of the most important elements of this is maintaining good relationships with the major ISPs, and the way we handle their email bounced from their systems is a key variable in that process.
Open Leads Email system manages bounces and classifies them as either “hard” or “soft” depending on what message is received back from the various ISPs that mail is sent to.
So what is the difference between a “hard” bounce and “soft” bounce, anyway?
Hard Bounces
We consider an email to be “hard bouncing” if the error message we get back from your leads email provider indicates a permanent condition, such as:
* email account doesn’t exist
* there is a spelling error in the email address (htomail.com versus hotmail.com, etc.)
In this instance, these leads will be blocked from your Open Leads Mail System – and will not be included in any mass emails. This will save you from using up credits on a bad address, and will serve to maintain good relations with the major ISPs by not bombarding them with repeated requests for mail delivery to non-existent email addresses.
Soft Bounce
If the error message we get back from your member’s email provider does not meet the criteria for a hard bounce, then the error is considered a soft bounce. Soft bounces can be due to the lead’s email inbox being over the allotted space limit, or other temporary problem.
If the email address generates an occasional soft bounce error, it will be logged but no other action will be taken. However, if the email address continues to return soft bounce errors for several days, then that then we will consider that a hard bounce.
Email Bounce Handling
Download User Guide
Many users have requested a simple user guide that they can print out to supplement the online help section. Here it is!
New Feature: Lead Details in Task Reminders
We just added a new feature sure to be popular amongst the road warriors using Open Leads. Now, when you receive an email reminder of a Task from Open Leads, the email message contains the contact information for that lead, including phone and email address.
BlackBerry and iPhone Users can click on the email address or phone number directly in the message body to open their email screens or on the phone number to dial.
New Feature: Modified Date
Users have a valuable new tool to track their activity with leads in their account. The date the lead was last modified is now incorporated into the Lead Detail. By selecting this data, either in the List View of your leads, or in your filter criteria, you can, for example, find all of the leads modified within a specific date range. This is especially useful in tracking leads you have contacted recently, or leads that have been neglected.
The Modified Date toggles with the Added Date on any of your Lead List Views. To display the Modified Date, click on the Asterisk in the Date Column, and then click on “Modified.” You may further refine the display by clicking on “Modified” once it is displayed in the column header, to choose between chronological and inverse chronological order of display. Inverse chronological is the default and displays the most recently modified lead.
You may also choose this field to set up Custom Views or Saved Views using Filters, choosing single dates, ranges, etc.
Tech Support: We are at your service!
Getting assistance with your Open Leads account is a just a click away!
Sometimes the online Help section does not go far enough to answer our users questions about using Open Leads. In those cases, we have two key Tech Support options available online, 24/7 – 7 days a week.
Support Form: Click on the “Support” Tab on our home page (www.openleads.com) and fill out the form. Your request will be assigned to a member of our team for prompt response. Bookmark this link for even quicker access.
Live Chat Tech Support – from either our home page, or from the Table of Contents in the Help section within Open Leads. Live operators are available to answer your questions in real time.
Importing Leads
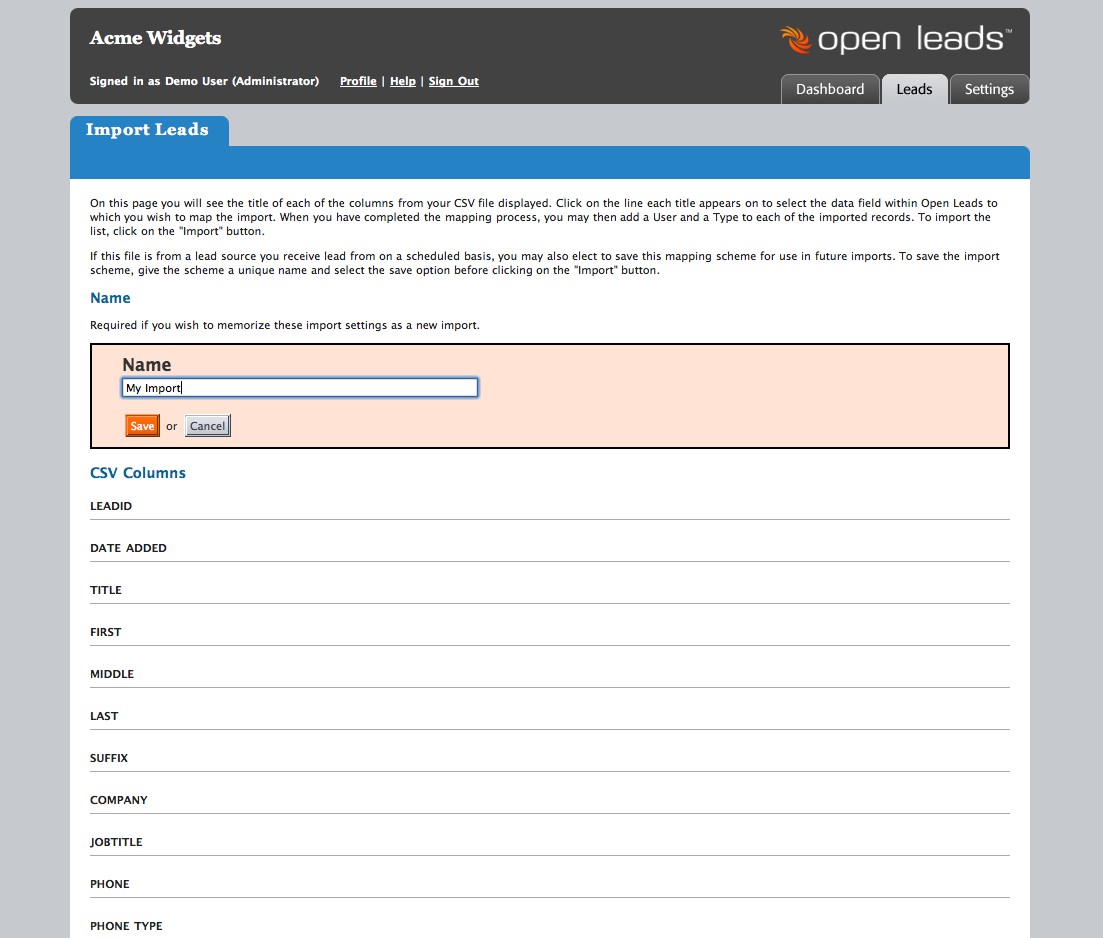
Open Leads makes it simple to import your existing lead list. Many users are moving their leads from another application, such as Outlook, while others may have been keeping their leads in a simple spreadsheet. The first step is to get your current leads into a Comma Separated Value (or CSV) file. Most applications allow you to export the data as a CSV file so thsi first step is pretty easy. Just make sure that the first line of your CSV file has the column or field names – this makes it easier to map your existing data to the fields in Open Leads.
To import leads, first click the Leads Tab on the top right corner of the screen. The “Import” link is located next to “Add Lead” in the gray bar above your lead list. Once you have selected this option, you will be able to choose a CSV file to be imported from your computer. Select the file and click “Next.” Select your CSV file from your hard drive, then click “Next” to continue. The following screen will allow you to name the import scheme. If you plan on importing a file from the same source again, saving the scheme will make the task easier
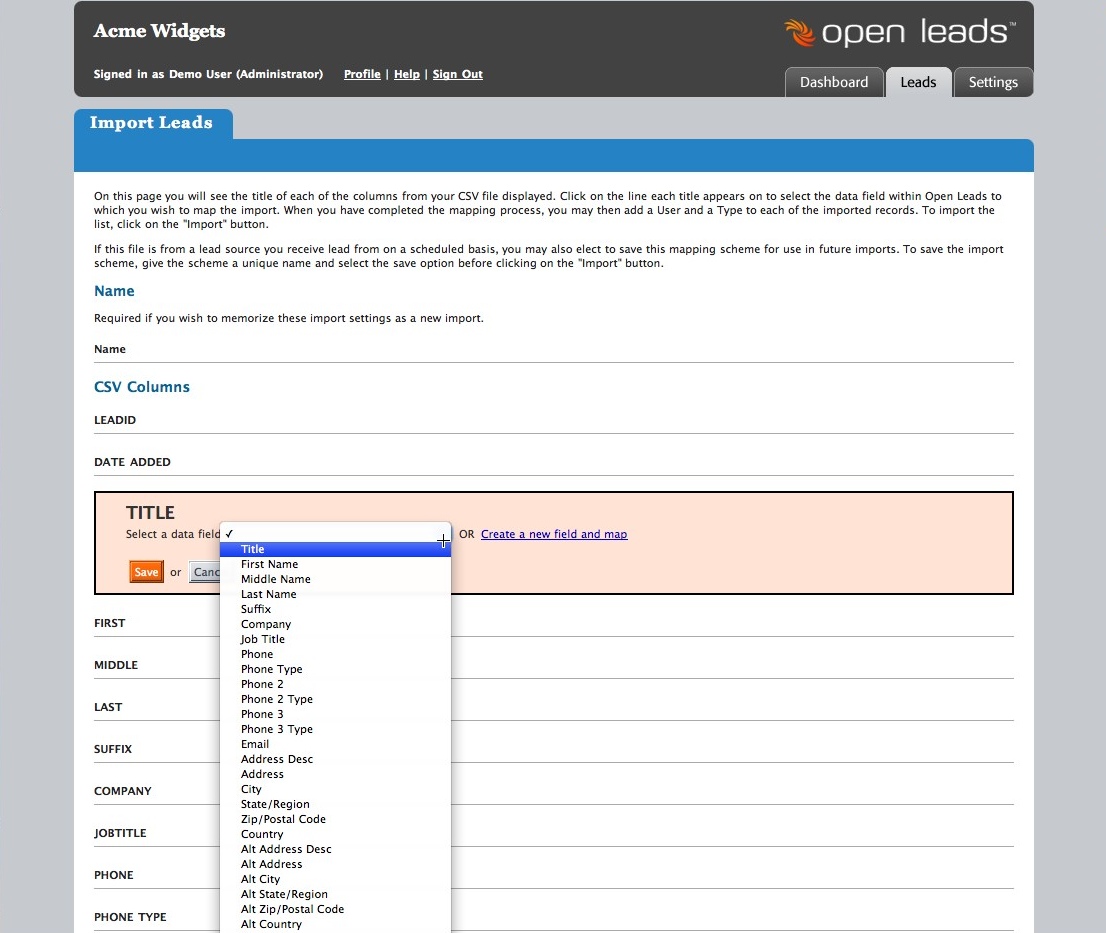
Then you can map the fields from your import file to the fields in Open Leads by clicking on the field and choosing your Open Leads fields from a dropdown list. If you need a field which you have not already created, you may click the link to add a new field to your account and map it directly from the import screen. Once you have the fields mapped, you can then opt to add a user and/or a type for the imported records.
Once you have the fields mapped, you can then opt to add a user and/or a type for the imported records.
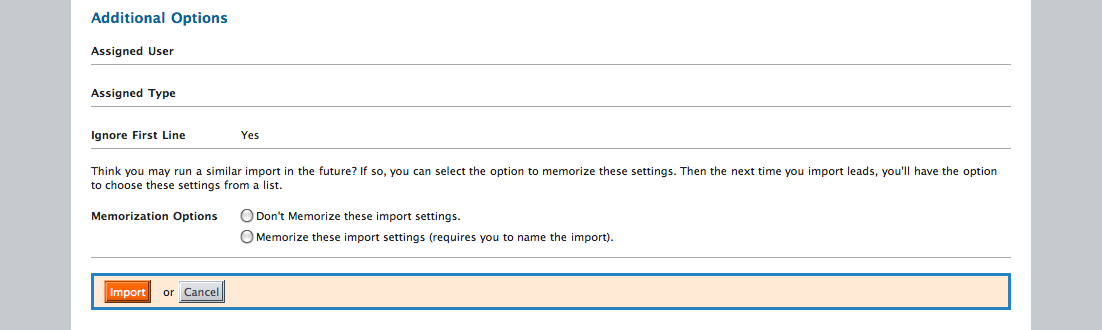
When you have determined that you have all the fields mapped, and the User and Type assignments in place, click “Import” to complete the process.
For the import feature to work properly, it is important to make sure you have two things in place: First, you need to have a clean CSV file that does not contain unnecessary data or rows or columns before you try to import it; and second, you need to have a field in Open Leads that matches up with the columns in your import file.
The best way to clean up your file is in your spreadsheet application – most users use Excel. Delete unnecessary columns and rows, and make sure each column is labeled clearly so that you will be able to reference it when you map your import. Then, once you are satisfied with your file, export it as a CSV. Be aware that there is a bug in Excel that may cause some problems. This is outlined on the Microsoft website. If you use another application, such as OpenOffice or use a Mac, this is not an issue.
Understanding Workflows
One of the most useful but frequently misunderstood features of Open Leads is the Workflow. A workflow is an automated process that can be automatically applied to a lead either upon form submission or by manual application to an existing lead within the system. Using workflows correctly will save you much time and energy in the sales process. What follows is a step by step process used to setup and apply a basic workflow to your account.
How do I add a workflow within my account?
From within your Open Leads account click on the settings tab located at the top of your screen. Within the settings screen choose the icon named “Workflows“. From there look for a link appropriately named “Add Workflow“.
Give your workflow an appropriate name
If you use an Open Leads form on your website to obtain leads, it might be helpful to create a workflow named Website Lead.
Specify a notification email address
Whenever your workflow is applied to a lead you have the option of receiving an email notification with details about the lead in question. In the email you will receive a link to view that particular lead. Viewing that lead will require to log into your account if you have not already done so. You may send this notification to multiple addresses by specifying each address followed by a comma.
Automatically add a type(s)
When setting up your workflow you have the ability to add appropriate created types from within your account. Using the example of the Website Lead workflow you could set the workflow to add the type “Website Lead” whenever the workflow is applied. Mouse over the box under “Types” and right click. This will display a list of created types within your account. Place a checkmark in the box beside the types you would like to be automatically attached when the workflow is applied and click save when done.
Attach users automatically
You have the ability to setup your workflow to automatically attach a user or group of users to a lead that a workflow is applied to. Mouse over the box under the heading Users and right click to see a display of the users within your account. Place a checkmark in the box beside each user to select them. You have two choices on how to attach users when the workflow is applied. The first method is simply setting the workflow to attach all checked users to the lead each time the workflow is applied. The second method is selecting a round robin method which rotates between attaching only one of your selected users each time the workflow is applied. You also have the option of allowing your selected users to receive a notification email with lead information each time the workflow is applied. If you desire this feature place a checkmark in the box located next to “Send email notice to selected users”.
Automatically send out pre-constructed email messages
Using messages that you have already created within your Open Leads account you have the ability to schedule the automatic delivery of messages to leads which your workflow is applied to. You can schedule a message to go the Lead’s email address (if its a valid email) immediately upon workflow application or at any time (i.e 7 days from application of the workflow). Many users use this feature to keep their sales prospects engaged with well crafted email newsletters. You can add as many messages as you wish and schedule them to get out at the time intrevals of your choice. To add a message to this section simply click “Add Message”. What will result is a pulldown menu of all the messages you have created within your account. Select the message of your choice and schedule when you want to go out. To schedule the message to go out at a later time choose the option “Later”. This will allow you to specify a specific time and date or schedule the message to go out in a certain number of days and/or hours (i.e 7 days 5 hours from workflow application). The latter scheduling option is generally more recommended since its likely you will want to use this workflow over a period of time.
Adding tasks automatically
It is highly likely that you will want to schedule tasks to make follow up calls or to send follow up emails. Instead of going through the hassle of attaching such tasks to each sales lead manually you can set your workflow to attach these tasks automatically to each lead upon application of the workflow. Like your autoresponders, you have the ability to schedule each task to occur immediately upon workflow application or within a specified time frame following application. For example you can create a task called Follow Up Call and schedule it to be completed in 7 days after application of the workflow. You also have the ability to set a email reminder regarding this task at a chosen time before the task is due to be completed. To add a task to your workflow simply select “Add Task” and follow the instructions accordingly.
How to apply this workflow I just created?
There are two ways to apply a created workflow within your Open Leads account. The most effective option is to use your workflows in conjunction with your created forms. Once your workflow is set access your created forms within the system(located off the settings tab) Click on the appropriate form to access the form edit screen. On the right hand side of the screen look for the section marked “Apply Workflow“. Click that section to display the dropdown menu of available workflows. Choose the one that you wish to use along with that particular form. Once either you or the prospect fill out the form in question that workflow and everything you set will be automatically applied to the lead record that results. The second way to apply a workflow is to apply it manually from within an existing lead detail screen. Within any lead already in your system pull up their lead detail. On the bottom right section of the lead detail screen look for the link “Apply Workflow“. Clicking this link presents you with a drop down menu of your created workflows. Select the workflow you created from this list and double click to apply it. Your lead detail screen will now be populated with all of tasks, selected users, etc. that you specified within the creation process.
In closing, workflows can be tricky to understand and grasp when you are just starting out. While they involve some setup and planning, their use can be invaluable to your sales process and are critical to maximizing the benefit of Open Leads.
Where did my Actions go?
In the latest release, “Actions” have been replaced with “Tasks.” Tasks are steps, activities, or other “to-do’s” that need to be completed to move the lead through the sales process.
Scheduled Tasks for each day appear on your dashboard as you log into Open Leads, and your entire list of tasks can be viewed from your Lead List. Each account now has two new Views included, one called “Active Tasks” and one called “Completed Tasks.” Clicking between these will show you your upcoming Tasks, whether scheduled or open-ended, and your completed tasks. You may modify these as you wish, or use them as guide to create other views for Active Tasks for a particular user, or period of time, etc., simply by recreating the filters used in these views, and then adding additional filters to display the data you want to see.
Creating Management “Reports” using Views
Sales Managers using Open Leads can create Management “Reports” using the filtering and view tools. Because users can filter their lead list by any field in the system, including Users and elements in the Sales Pipeline, plus date range and save these as views, creating views to show all closed sales, pending sales, sales by salesperson, etc. are quick and easy.
For example, to create a View to show closed sales this month – go to your Lead List, and selct “Add Filters.” For the first filter, select “Status/Pipeline” and then select “Closed Won.” This will show you all of your closed sales. By simply adding a field for “Date Sold,” you can then add a filter so that the results will show all closed leads for a period of time, such as the current week or month.
Manage your list with Types
The Types system in Open Leads gives users a great deal of flexibility in managing and sorting your leads. While the Pipeline System allows you to flag a lead as a Hot, Warm, Cold or Closed lead, Types allows you to build upon this by creating segments of your lead list – such as Current Customers, Website Leads, Walk-ins, Phone Leads, etc.
Lead segmenting using Types means that you can break up your marketing and handle these segments in different manners if you wish.